This article is about managing panel stock with OPCutting.
You have a stock of panels that you manage manually or with specific software, but you don't know how to take into account changes in this stock when you need to optimize panel cutting.
OPCutting is capable of displaying and printing a list of the formats and quantities of the panels used in your cutting optimization, and of generating a list of off-cuts that can be exported in csv format. You can then use these two lists to update your panel inventory, removing from stock panels used in cutting optimization, and adding any off-cuts whose dimensions are sufficient for them to be considered as usable panels, and therefore to be included in your inventory.
Manually, it's a time-consuming process, but a simple one, whether or not you're using stock management software.
If you manage your panel stock manually:
You can print these two lists and export the off-cuts list in csv format for subsequent import into Excel.
Then you take each panel format used in your cutting optimization (displayed in the cutting optimization panel list) one by one, and subtract the quantity of panels of that format from your stock in your notepad or Excel file in which you record your panel stock info.
Finally, take the list of off-cuts. Go through each off-cut format one by one, and add the quantity and format of each off-cut (format) you wish to add to your stock.
Important: As OPCutting is not "connected" to your actual stock, it can produce panel quantities greater than those you actually have. It's therefore important to take this into account, and to run a cutting optimization simulation with the software to compare with your actual stock, so that you can order any panels you may be short of before embarking on your panel cutting optimization.
If you manage your panel stock with software that supports data import in xls or csv format:
You can export the list of off-cuts in csv format and then import it into Excel. You will need to manually enter the panel formats and quantities for your cutting optimization.
Then, using formulas and possibly macros, you can format this data to make it compatible with your stock management software. Finally, you generate an .xls or .csv stock update file that you can import into your software.
As each stock management software has its own specificities, I can't give you a more precise diagram on how to generate the stock update data format, but if you have difficulties with Excel formulas and macros, but nevertheless know the data format expected by your software, don't hesitate to contact me for help.
Well, all this isn't very concrete, so I'm going to give you an example, with Excel formulas for determining panel quantities and references. In this example, the panel references are not very realistic, but it will nevertheless give you a better understanding of how to proceed.
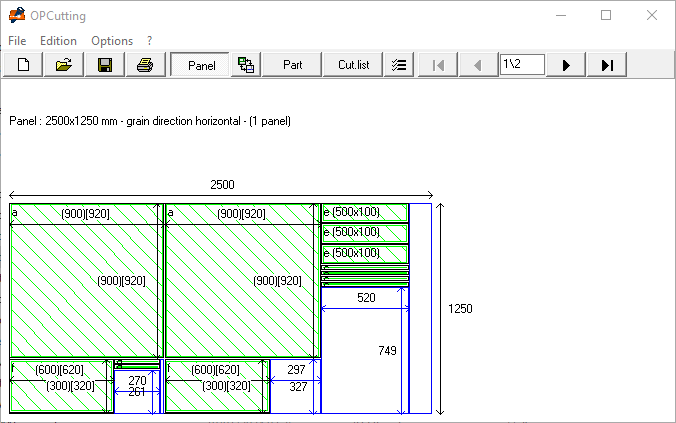
Once you've created your panel cutting optimization with OPCutting (
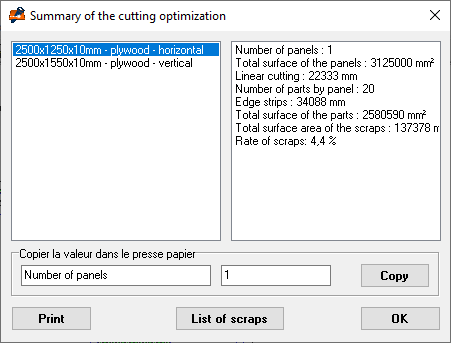
see Creating a cutting optimization), export the list of off-cuts. You can also print the cutting optimization summary so that you can re-enter the information in Excel.
Then click on the "off-cuts list" button to display the list.
Finally, click on "Export".
You can select the offcuts to be exported by size or surface area.
Click on the "OK" button to confirm the export and enter the file name and select the directory in which you want to save it.
Now open Excel and import your csv file containing the off-cuts list.
Here's how the data looks.
You could, for example, rename the corresponding tab to "Cuts-list". Next, create the "Cut-panels" tab, in which you will enter the cut panels, and the "Update-stock" tab, which will contain the Excel formulas for generating your stock update data.
From the cutting optimization summary, enter your panel list in Excel in the "Cut-panels" tab, referring to the formats in the left-hand column of the summary and the number of panels per format in the right-hand column.
Once all the panels have been entered, it's time to create the stock update file, which will be generated from the "Update-stock" tab.
Please note: The example below must be adapted to the stock update file format expected by your stock management software. The order and column names may differ, or there may be columns with other information. If this is the case, please refer to your software's documentation or contact your software publisher for the appropriate format.
The formula for determining the quantity of panels used in cutting optimization and therefore to be deducted from stock for a given panel format is "=-
Cut-panels!A2" which means :
"=-[Sheet name]![Cell name]" (equal sign, followed by minus sign, followed by the reference to the cell in which the value for the number of panels is found). The minus sign is used to subtract the quantity from the stock.
The formula for determining the quantity of off-cuts considered as panels that can be added to the stock for a given panel format is "=
Cuts-list!A2" which means : "
=[Sheet name]![Cell name]" (equals sign, followed by the reference to the cell in which the value for the number of offcuts is found).
This time there is no minus sign, as the quantity is to be added to the stock.
In this example, the reference is determined by the formula :
"Pan-" &'Cut-panels'!B2& "-" &'Cut-panels'!C2& "-" &'Cut-panels'!D2&'Cut-panels'!E2"
Creates a reference by assembling the characters "
Pan-", followed by the reference to the cell in which the length value is found, followed by the reference to the cell in which the width value is found. followed by the reference to the cell containing the length value, followed by the reference to the cell containing the width value, followed by the reference to the cell containing the thickness value, followed by the reference to the cell containing the panel type designation.
Of course, this reference is a very simplistic example which probably doesn't conform to the way you determine your panel references in your stock management software, but you can very easily create an Excel formula adapted to the way you work.
The formula for determining the fall reference is virtually identical, except that the values are retrieved from another sheet.Once you've completely filled in your "
Maj-stock" tab, all that's left to do is export it in txt, slk or csv format, depending on which formats your stock management software accepts.
Click on "
Save as", then select one of the following formats
Then open your stock management software and import the file you've created into Excel.
If you have followed all these steps correctly, you should be able to update the stock in your software, avoiding any input errors and, with a little practice, saving quite a lot of time.
Here is a summary of the benefits of using OPCutting